Photo of Roger Grochmal

The Dog Days of Summer

As we move into the dog days of summer, we see a lot of thunderstorms with this oppressive heat and humidity. These storms can deliver a significant amount of rain 5-10 cm (2-4in) in a very short period of time. Many storm sewers can’t deal with this kind of sudden deluge and like all systems when put under stress, sewers and drains can back up and fail. Over years sewage pipes can sag, crack, get infiltrated with tree roots and become blocked with waste. When they back up, it can lead to not only an urgent repair but also the need to clean up a very messy basement.

Many of our customers who have older homes or live in flood prone neighbourhoods (mine is one of them), have one of our drain technicians come out to do a camera inspection of their drain system as a preventive measure. We can also test the sump pump and check for a backwater valve. This is a complementary service we offer to all of our customers who have a service membership. Many municipalities have generous rebate programs for drain system improvements. Call 1-888-888-1108 today to schedule your complementary drain inspection.

How can I protect my HVAC equipment from Electrical Surges?

The second outcome of thunderstorms comes as the result of a loss of power and/or a power surge. All HVAC equipment like most other devices in our lives has electronic components and controls that can fail with a sudden surge in power. The best protection is a surge protector. This is an affordable way to manage a big risk. We carry these devices on all of our service trucks and typically install them during a maintenance visit. Talk to your maintenance technician and find out how you can protect yourself from damaging power surges.

Feel the Love

Every year Lennox works with local dealers to provide free furnaces to families in need. In 2020, AtlasCare is delighted to partner with Lennox in this program in the GTA. People across the country recognize deserving individuals in their hometowns by nominating them to receive new heating systems. Each nomination recognizes an unsung hero who may be going through hardship, helping others in need or simply supporting their community. And this year, given the recent COVID-19 pandemic, the program focus is expanding to bring hope and support to medical professionals, essential workers and those on the frontlines. For tips on deciding who to nominate, see our guidelines. Help us help someone in need and nominate someone by August 31. Thank you.

Roger Grochmal, P.Eng.

CEO

Are You Cool Enough?

When we find ourselves in a prolonged heatwave such as we are now experiencing, we get a lot of calls with the complaint that the house isn’t getting cool enough. It may not have been that important to us in the past but in the time of coronavirus when we are all spending so much time in our homes, we really notice it. The implication is that there must be something wrong with the air conditioner. The reality is that the air conditioner is doing exactly what it is designed to do. Standard design conditions for the Greater Toronto Area require an air conditioner on a 30°C day to be able to cool a house by 7°C down to 23°C. On a 33°C day, the temperature inside the house would rise to 26°C. Since houses and air conditioners are rarely exactly matched you can sometimes get an extra degree or two out of the system. That’s it.

How can I broaden the comfort range for my home?

The obvious solution is to put in an air conditioner that is one size larger. Problem solved. Unfortunately, it’s not that easy. While you might be more comfortable on those extremely hot days, the tradeoff is that you would be very uncomfortable on all the other warm days. The AC unit would easily bring the temperature down to where you want it, but it would not run long enough to remove the high humidity we experience. The result would be a cold, clammy house. Not that comfortable.

Is there a good solution?

95% of all homes have a basic single-stage air conditioner. The good news is that we have 2 stage and variable stage air conditioners that can significantly stretch the comfort range so that you can achieve the temperature you desire while maintaining good relative humidity levels in your home. These AC units are also very efficient so that you don’t pay an energy penalty. This is what I have in my own home. It does require that you have large enough ducts to handle the extra airflow required. Another solution is to add cooling to specific areas of a house such as a master bedroom or home office. This could be in the form of a portable AC unit or a wall hung ductless type air conditioner.

I am always amazed at the expense and effort people will go to create beautiful indoor living spaces and end up being uncomfortable because they didn’t fully examine the options available for their HVAC system. If you want to be more comfortable in your home, invite an AtlasCare comfort advisor in to go over your options. We pride ourselves on bringing solutions not boxes.

Roger Grochmal, P.Eng.

CEO

What It Means If Your Air Conditioner Still Uses R-22 Refrigerant

Pop quiz: what type of refrigerant does your air conditioner use?

Don’t worry too much if you don’t know the answer! Most people are in the same boat. After all, air conditioners are a closed system, with the refrigerant totally out of sight and out of mind.

Still, it pays to know what’s going on inside your A/C, especially since one popular type of refrigerant is about to be phased out!

We’ve put together a quick primer on what you should know the upcoming phase-out of R-22 Freon or refrigerant. Read on to learn about:

  • What is R-22 refrigerant/Freon-22
  • Why R-22 refrigerant is being phased out in 2020
  • How to tell what kind of refrigerant your air conditioner uses
  • What you should do if your air conditioner uses R-22
  • Replacing R-22 with a better alternative

What Exactly is R-22 Refrigerant of Freon-22?

Refrigerant is a substance that absorbs, transports and releases heat as it moves from a gas to a liquid/vapour state. It circulates through a system of tubes to extract heat from the air inside your home and then release it outside, creating the cooling effect that gets us through the summer.

For decades, the standard substance used as refrigerant in residential air conditioners was R-22. Officially called chlorodifluoromethane, R-22 has been sold under numerous names that include:

  • HCFC-22
  • R-22
  • Genetron 22
  • Freon 22
  • Arcton 4
  • Arcton 22
  • UN 1018
  • Difluorochloromethane
  • Fluorocarbon-22
  • Refrigerant 22

Starting January 1, 2020, it will no longer be legal to import or produce R-22 in Canada or the United States. The only remaining source of R-22 will be that which is recycled, reclaimed or recovered from existing units.

In other words, R-22 refrigerant is being phased out of use.

Why is R-22 Refrigerant Being Phased Out in 2020?

It’s not by chance that R-22 is about to be in short supply.

You might’ve heard warnings about the dangers of releasing Freon into the atmosphere. That’s because R-22 interacts with the sun’s UV rays and produces chlorine, which is known to contribute to depletion of our ozone layer.

Back in 1987, Canada and the United States both signed an agreement called the Montreal Protocol. This included a commitment to phase out ozone-depleting substances (ODSs) called hydrochlorofluorocarbons (HCFCs), including R-22.

The plan to phase out R-22 has been well underway for years, but 2020 marks the first year that no new supplies will be brought into Canada or the U.S.

How Do I Know If My Air Conditioner Uses R-22?

You can probably tell which type of refrigerant your air conditioner uses based on its installation date.

The two main types of refrigerant used in air conditioners today are R-22 and R-410A. Most central air conditioners manufactured and installed before 2010 use R-22 refrigerant, as was the standard at the time. Units installed after 2010 are more likely to use R-410A.

You can tell when your A/C was installed based on the owner’s manual. Here in Ontario, it’s standard practice for the installer to write down the date of installation in that manual.

Should I Be Worried If My Air Conditioner Uses R-22?

No need to panic! Your air conditioner isn’t dangerous, and it certainly isn’t illegal.

However, there’s a good chance it will become more expensive to repair.

Starting in 2020, R-22 refrigerant is going to be in increasingly short supply. So, if your A/C develops a leak and needs a refrigerant “refill”, it will be far costlier to you than it ever was in the past.

In fact, the cost of R-22 has already gone up in anticipation of this change!

Can I Convert My Air Conditioner from R-22 to R-410A?

You can have your R-22 air conditioner converted to use R-410A, but it’s not as simple as it sounds.

It’s not only a matter of removing the old refrigerant and adding the new. Your air conditioner will require a whole new line set and a new evaporator coil. You will also need to have the old components disposed of in a safe, professional manner.

Considering most R-22 air conditioners are at least 9 years old, it’s unlikely that these retrofits are worth your money. A newer model air conditioner that’s built to use R-410A from the ground up will last longer and consume far less energy month-to-month. From a cost perspective, installing a new air conditioner is the far better choice in the long run.

Still have questions about the R-22 refrigerant phase-out? Feel free to call us or contact us online. We’re here to help you 24/7.

How a Simple Plumbing Check Could Put More Money In Your Pocket

When was the last time you called a plumber?

If you’re anything like most people, it was probably when you needed some plumbing work done in your home. The majority of our plumbing calls come from customers who need a specific repair or upgrade (ideally as soon as possible.)

But isn’t that the only reason to call? Why contact a plumber when you don’t really need to?

Well, there are several reasons. For one, we always enjoy catching up with our neighbours! But there’s also a different type of service call we wish we received a lot more often:

Plumbing system checks.

From time to time, people call and ask for us to inspect their plumbing system ‒ even though there’s nothing obviously wrong with it.

What is a Plumbing System Check?

You might know them as plumbing inspections, tune-ups or diagnostics. We usually call them plumbing system checks. Whatever the name, the purpose of this service is the same: to find out the status of your plumbing system and stay ahead of any necessary repairs.

During a plumbing check, a licensed and certified plumber inspects various parts of your plumbing system, including toilets, sinks, showers, tubs, water pipes and drain pipes. They’ll check that fixtures have good water pressure and are draining properly. The plumber will also ask you questions about how your plumbing system has been functioning.

You’ll have a chance to talk about any specific problems or concerns that have come up since the last time your plumber was there.

Essentially, a plumbing system check is like an annual physical for your pipes and fixtures! It’s a chance to check up on potential problems, get a “big picture” of your plumbing system, and make plans for upgrades or repairs if necessary.

How Getting a Plumbing Check Could Save You Money

You might wonder: why go to all the trouble of having your plumbing system checked when you’re not even sure there’s a problem?

The people who invest in preventative checks don’t do it because they like spending money on their plumbing system. In fact, it’s the opposite.

Here are a few of the ways that a routine plumbing inspection could put more money in your pocket!

1. Find and Fix Leaky Pipes

You would be shocked to learn just how common it is to find water leaks in a home’s plumbing.

Some leaks, like dripping faucets, are obvious. But many go undetected for years because they’re hidden behind walls…even as they waste thousands of dollars in water each year!

How’s that possible? According to the City of Toronto:

  • 1/16’’ diameter hole (slightly larger than the tip of a ballpoint pen) costs $14.12 per day.
  • 1/8″ diameter hole costs $55.37 per day.
  • 3/16″ diameter hole costs $127.07 per day.

That’s an astonishing cost to just let slip by for so long!

Having your plumbing checked annually can help you catch on to those types of leaks far sooner.

2. Avoid Costly Water Damage

Sure, leaky pipes can cost a few hundred dollars to repair. But if that leak grows and the pipe eventually bursts…you could expect to be on the hook for thousands more just to clean up the mess.

It doesn’t take much time for a burst pipe to cause four-figure damage to your home. Water damage can also spur the growth of mould, which can be an even bigger headache to deal with in the aftermath.

It definitely pays to have those leaky pipes diagnosed and repaired as soon as possible.

3. Make Your Pipes Last Longer

Plumbing pipes aren’t made to last forever, especially ones made from outdated materials like polybutylene. But even the best-quality pipes installed by the most skilled master plumber will eventually need to be replaced!

Having them inspected will help you keep your pipes healthy and know when it’s time to have your system repiped.

4. Avoid a Plumbing Emergency

Speaking of repiping…the job is a whole lot smoother when it’s a planned project! Having to conduct emergency repairs on the spot comes with added costs and a much bigger mess.

Other plumbing emergencies, like sewer line collapse and sewage back-up, can also carry a very high price.

You can save yourself from thousands of dollars in damage by detecting potential problems like these before they reach a tipping point. That’s exactly what plumbing system checks are for!

5. Plan for Future Repairs and Renovations

A plumbing check gives you a detailed overview of your pipes, faucets, and other fixtures every year.

With this information, you can easily plan ahead for what needs to be replaced and when ‒ instead of fixing and replacing things as they break.

You can wait until the time is right. No more surprise plumbing expenses!

7 Signs It’s Time for a Plumbing Check

It pays to schedule an annual plumbing check, even when there’s nothing clearly wrong with your plumbing system. But if you’re seeing any of the following signs, you’ll want to book your appointment sooner than later to avoid bigger problems.

  1. Unusually high water bills
    Often a sign of a small leak somewhere in the system.
  2. Foul-smelling drain
    Indicates a partial clog, mould, or bacteria in your drain pipe.
  3. Unexplained sewage smell (occasionally or often)
    Could be a problem with your traps or drain ventilation that’s causing sewer gas to come into your home.
  4. Slow-draining tub, sink or toilet
    One of the most common signs of a clogged drain. Multiple slow-draining fixtures could indicate a more serious sewer line problem.
  5. Low water pressure
    Leaking faucets, mineral build-up, or a damaged shut-off valve are all possible causes.
  6. Discoloured or off-smelling water
    May be caused by rust, sulphur or other metals inside your pipes, or a problem with your water heater.
  7. Noisy/banging pipes
    Some of your pipes may not be properly secured.

Ready to book your annual plumbing check? AtlasCare will send a licensed, certified plumber to inspect your home in the Greater Toronto Area today. Call us or contact us online to schedule a same-day or next-day appointment!

5 Simple Things You Can Do Now to Keep Your Home Cozier This Winter

Once the calendar flips from October to November, life starts to get busy ‒ fast. There’ll be presents to wrap, gatherings to attend, dinners to make…in fact, things probably won’t slow back down until next year!

Needless to say, furnace trouble is the last thing you want to be dealing with over the busy holidays. Unfortunately, that’s exactly when trouble tends to call! You’d hate to be scrambling to stay warm, and keep your pipes from freezing on top of everything else.

The good news is that most common winter HVAC issues are preventable! All it takes are a few simple, proactive steps to get your home ready for winter. With a bit of help, you can get these jobs done and keep your home cozy in no time!

1. Check Your Furnace

First thing’s first: head down to the basement and give your furnace a good, old-fashioned inspection! Here are a few things you can safely do on your own before your annual furnace tune-up.

  • Tidy up around the furnace. It’s generally recommended to leave at least 3 feet of clearance around the unit, so put away any boxes or other odds and ends that were stored there over the summer. This will also make it easier for your HVAC technician inspect and service the furnace later!
  • Make sure your humidifier is set up for winter. Turn the water on for the humidifer and open the bypass damper if there is one. The damper is labelled either summer/winter or open/close.
  • Pay attention to sounds and smells. You know how your car sounds when something is wrong? Your furnace can also give audible warning signs. Be on alert for odd smells as well, especially the telltale “rotten egg” odour of gas.

2. Replace the Furnace Filter

Furnace filters remove particulates like dust, pollen and fibres from the air moving through your heating system. A dirty air filter restricts airflow and forces the furnace to work harder, thus consuming more energy and putting more strain on the unit.

  • Replace the filter now! Your furnace’s 1” filter should be replaced at least every 3 months during the heating season. Starting off with a clean filter means you won’t have to remember to replace it again until next year.
  • Consider an upgrade for cleaner air. The Minimum Efficiency Reporting Value or MERV rating tells you how well a filter removes various particulates from the air. Filters with a MERV rating of 9 to 12 will capture 95% of airborne pollutants like bacteria, dust and smoke. Just be sure your furnace is equipped to handle a filter with a higher MERV rating! These quite often require alterations to your existing ductwork.

3. Clean Your Air Vents

Any dust, lint or other “fuzz” that has accumulated on the vent over the summer will reduce the flow of air.

  • Check and clean the supply and return air vents around your home. Don’t forget spare bedrooms and bathrooms.
  • Make sure there’s space for air to flow. This is also a good time to make sure that none of these vents are blocked by furniture, area rugs or other objects.
  • Consider having your ducts cleaned. If you want to keep your ducts as tidy as possible, we generally recommend having a professional duct cleaning about every 3 years. You should have your ducts cleaned sooner if you notice excessive dust, restricted airflow, mould, odours or other signs that something’s wrong.

4. Test Your Thermostat

Your heating system can’t do its job if your thermostat isn’t working correctly! Many problems you’d assume are caused by your furnace actually originate with your thermostat. You might not have thought much about it over the summer, but now is definitely a good time to make sure your thermostat is doing its job.

  • Try adjusting the temperature a few degrees above or below room temperature and see how long it takes to adjust.
  • Check your thermostat’s programming throughout the day on a less busy day. Is it adjusting the temperature on schedule?
  • Consider a thermostat upgrade. If you find all these adjustments to be a hassle, you’re not alone. Smart thermostats make this all much

5. Watch the Humidity

Dry air is one of the most common discomforts in the home during winter. If your home doesn’t have a whole-house humidifier, you might start to notice a few of these signs!

  • Count the number of static shocks you get. Since dry air acts as an insulator, static electricity can easily build up to a nasty shock in the winter. If you’re noticing it more than usual, your humidity is definitely on the low side.
  • Notice chapped lips, cracked knuckles, and itchy, flaking skin. This prevalent winter problem is in part due to the dry air outside and the low-humidity, heated air indoors. Adding a humidifier to your home can help.
  • Look for moisture on the inside of your windows. This could be a sign of the opposite problem: poor ventilation causing excess humidity to build up in your home. Call a home comfort specialist before the problem leads to mould.

Get Ahead of Winter

There’s still time to get the job done and make sure your home is protected! Call us at 647-952-2012 or contact us online to book your seasonal furnace tune-up in the Greater Toronto Area today.

Why a Frost-Free Hose Bib Is a Must-Have for Canadian Homes

As the weather starts to change and the temperature drops, you’ve probably already started preparing for the long winter season.

You know there’s a lot to do around the home this season, but one area you might overlook is your hose bib ‒ or, as many people call it, your outdoor faucet.

During the summer, you might use your hose bib to water the garden, wash your car, or even hook up the sprinkler for your kids. When the warm season comes to a close, you pack away the hose, shut off the valve and move onto something else.

But what about the water that’s still sitting in the pipe?

Even if you purge the line, you could still end up with costly water damage if you don’t have a frost-free hose bib.

Let’s take a look at how a frost-free hose bib can help you avoid a burst pipe this winter! Read on to learn:

  1. What a hose bib is, and what it does
  2. How a hose bib is connected to the rest of your plumbing system
  3. Purpose of a ‘frost-free’ hose bib
  4. What can happen if your hose bib freezes
  5. How to prevent your hose bib from freezing this winter

What Is a Regular Hose Bib, and What Is It For?

The hose bib is the small faucet on the exterior of your house. It’s essentially an outdoor tap that allows you to run water from the inside of your house to the outside. You use this tap to attach your garden hose for many different jobs.

A hose bib is also called a:

  • Exterior faucet
  • Spigot
  • Sill cock
  • Hose faucet
  • Outdoor tap
  • Hose valve
  • …and many other things!

A regular hose bib typically features a ½, or ¾ inch threaded pipe that lets you screw on a garden hose, and a handle on the top to open the valve on and off.

Inside your home, there is usually a shut-off valve that lets you stop the flow of water leading from the valve to the end of the pipe.

How Does a Hose-Bib Work with the Rest of Your Plumbing System?

Your hose bib is connected to the entire plumbing system in your home, which is what allows you to get water to the exterior of the house. The pipes lead from the end of the hose bib to the main supply in your home.

As mentioned, many homes, especially in the north, have a separate valve inside the house to help prevent the pipes from freezing. But one issue many homeowners run into is that the valve is still too close to the exterior of the home.

When the valve isn’t far enough away from the hose bib, the water is still sitting dangerously close to the freezing zone.

A frost-free hose bib prevents that issue from occurring.

What Is a Frost-Free Hose Bib?

From the outside of your home, a frost-free hose bib looks the same as a traditional one. The difference between the two happens inside the house.

The pipe on a frost-free hose bib is longer than a regular one, and the shut-off valve is further inside the house where the temperature is warmer.

We always recommend having a licensed, certified plumber install your frost-free hose bib, since they can ensure that it sits at the proper angle to keep water from draining to your home’s foundation.

What Happens If Your Hose Bib Freezes?

If your hose bib freezes, it could lead to cracked pipes and water damage. When the pipes break, the damage could spread beyond the valve, which would cause the main flow of water to spray inside your home. Since these pipes often lie near essential components of the house, such as breakers, electrical wiring, and appliances, we consider this a plumbing emergency.

How to Prevent Your Hose Bib from Freezing in the Winter

The best way to prevent your hose bib from freezing this winter is to install a frost-free hose bib.

We understand how important your home is to you and how much time you spend taking care of it, so the last thing you should have to worry about this winter is water damage!

The team at AtlasCare is happy to help you protect your home this winter. Call us or contact us online to learn more about having a frost-free hose bib installed in your Greater Toronto Area home.


Benefits of a Humidifier for Your Furnace (Especially in Winter)

When winter falls in Toronto, it’s time to kick up the heat and make sure your family is comfortable. While your furnace may throw off a lot of heat and warm up your home, we often neglect to think about all the negative effects that dry heat has on our bodies.

We want to help you understand the importance of having a furnace humidifier and how installing one can ensure everyone stays nice and cozy this winter! Here, we’ll cover:

  1. Benefits of a humidifier in the winter
  2. Difference between furnace humidifiers and standalone humidifiers
  3. Types of furnace humidifiers: Bypass, Drum, Flow-Through and Whole-Home humidifiers
  4. What’s required to maintain a furnace humidifier
  5. How to install a furnace humidifier

Why Do You Need a Humidifier?

The winter air is dry, and it does quite a number on your respiratory system and skin. During the winter, we notice things like cracked skin, stuffy noses, sinus problems, and colds. These issues are due to the dry air outside but also from the dry air inside your home.

Having a furnace humidifier helps add moisture to the air, which makes your home more comfortable. The moist air can even help your house feel warmer while still burning the same amount of fuel.

Fluctuating levels of humidity in the home are not only harmful to your body, but it also wreaks havoc on your wood finishings. Too much humidity can lead to dry rot and mold.

There are many different types of humidifiers, so it’s essential to understand each one and how they differ.

The Difference Between Furnace Humidifiers and Stand-Alone Humidifiers

First things first: we want to make sure you don’t confuse furnace humidifiers with the traditional stand-alone ones.

Furnace humidifiers are installed into your HVAC system, so the air coming from your heating unit is humidified throughout the entire house.

A traditional, stand-alone humidifier plugs into a wall outlet and sits on the floor. These are the kind of humidifier you’ll find at stores like Costco or Canadian Tire.

Stand-alone humidifiers only expels the moist air directly from the vents on the unit. This means that the air around the humidifier has the most moisture, and the further you get from the unit, the dryer the air.

To humidify your home with stand-alone humidifiers, you would have to purchase a unit for nearly every room of your house. Not to mention they’re an eye-sore that take up floor space and adds to your electric bill as well!

Plus, stand-alone humidifiers require daily maintenance of filling and cleaning the water tanks. An HVAC humidifier would only require a check at the beginning and end of winter.

Furnace humidifiers require a bit more of an investment upfront, but the long-term benefits far outweigh the initial cost!

Types of Furnace Humidifiers

There are three primary types of furnace humidifiers: bypass/drum-style humidifiers, flow-through units, and whole-home humidifiers.

Bypass/Drum Humidifiers

These install directly to your HVAC system, and they act as a moisture supply to your furnace blower.

When the hot air blows through the bypass, it runs through a rotating wet pad. These must get connected to your home’s water supply, and they usually have a humidistat.

You set the humidistat to the desired humidity, and when the sensor drops below that level, the unit kicks in!

Flow-Through Unit

This unit does require a water supply, so there is less maintenance but a higher cost.

For these, the unit will detect the level of humidity in your home and kick on when necessary. When the humidifier comes on, it will draw water from your main supply to soak a water panel. The hot air will pass through the water panel and supply moisture to the home through your ducts. These humidifiers have no stagnant water for the pad to run through.

Whole-Home Steam Humidifier

These humidifiers work separately or with your furnace. They hook up to your home’s water supply, and the water is heated. When the humidistat determines that the humidity is below your desired level, it kicks on.

The humidifier will heat the water and convert it to steam and then pass it through your home using the ducts. This choice is most useful for larger homes and people looking for the best long-term solution to dry air.

Installing a Furnace Humidifier

Installing a furnace humidifier does require a certain level of knowledge and skill. Installation instructions come with the units. Drum style and flow-through units install on your home’s bypass duct so they can use the supply plenum to draw air.

For many furnace humidifiers, we recommend hiring a professional to take care of the job. Humidifiers run on 24 or 120 or 240-volts, which can require an extra circuit in your electrical panel. As we said, the upfront cost is minimal when you look at the long-term benefits and lack of necessary maintenance on these units.

Additionally, in many cases, you must hire a professional in order to maintain the humidifier’s warranty. Installing the unit yourself can leave you without coverage in the event of a problem!

Furnace Humidifier Maintenance

Although they don’t require as much day-to-day maintenance, furnace humidifiers do benefit from service from time to time. Basic furnace humidifier maintenance includes:

  • Checking pads or panels for sediment build-up at least once per year.
  • Cleaning the entire unit once per year.
  • For whole-house humidifiers, having a professional check the heating element every few years.

Overall, maintenance of a furnace humidifier is limited as long as you keep up with the unit and the beginning and end of the winter season.

How to Know If Your Sump Pump is Working Properly

We know how easy it is to let your home’s plumbing fall by the wayside, especially when everything seems to be flowing smoothly. But it’s quite important to have your plumbing system checked every now and then, even when nothing appears to be wrong.

That’s especially true of your sump pump.

You might not use it very often, but performing regular maintenance and replacing your sump pump when necessary can spare you hundreds or thousands of dollars in water damage. Here, we’ll tell you everything you need to know about sump pumps: what they are, how they work, what types are available and how long they last.

  • What a sump pump is and how it works
  • How do I know if my home has a sump pump?
  • What kind of sump pump do I need?
  • How long does a sump pump last?
  • Why a sump pump is important for the value of your home
  • Can I install a sump pump myself?

Start by answering the question, “What is a sump pump?”

What a Sump Pump Is and How It Works

A sump pump is an electrical appliance designed to drain groundwater from outside the wall of your basement or crawl space, and keep the space dry. Basically, it prevents flooding in and around the foundation of your home.

It’s actually a pretty simple device. The pump is installed in a pit in your basement (called the sump). When it detects water in the sump, the pump activates and pumps the water away from your house through a network of pipes.

Your sump pump may run rarely or often, depending on the moisture in the soil around your house. It only runs when water needs to be drained.

Things that affect how often your sump pump runs include the slope of the ground around your house and the depth of groundwater in your area.

How Do I Know if My Home Has a Sump Pump?

If your home was built before the 1980s, it probably was not built with a sump pump. However, it may have had one installed later on.

Homes built during the 80s and later that have a basement likely do have a sump pump. If your house is on a crawlspace, you’ll need to look to see if a sump pump is there.

Note the houses built on a slab typically do not have sump pumps.

To identify a sump pump in your home, look around your basement or crawlspace for a formed pit or hole in the floor with a pipe that comes out of it and exits the house.

What Kind of Sump Pump Do I Need?

Sump pumps are categorised by the amount of water they can displace, and they come in a variety of outputs. Typically, homes in Toronto do well with a ⅓ horsepower pump.

Additionally, you’ll see sump pumps in these styles:

  • Pedestal—Good for smaller pits when there isn’t sufficient room for a submersible pump.
  • Submersible—Sits below water level, inside the sump basin, and is quieter, less obtrusive, and safer than pedestal pumps. These are standard sump pumps and they are more efficient and longer-lasting than alternatives.

How Long Does a Sump Pump Last?

Speaking of longevity, a typical submersible sump pump lasts about 10 years. Although your sump pump may run into problems as time goes on, many of them can be avoided through regular maintenance.

Why a Sump Pump is Important for the Value of Your Home

A sump pump is a fast, safe, and reliable way to protect your home from water damage. With the increase in springtime flooding in the Greater Toronto Area, you must make sure your sump pump is ready to help when you need it. So don’t wait until flooding season is upon us to have yours checked out!

Can I Install a Sump Pump Myself?

Some homeowners have successfully installed a replacement sump pump once their current pump has passed its effective date. However, with that in mind, consider the benefits of hiring a professional instead of taking the DIY approach:

  • The work gets done faster.
  • We already have all the parts and materials needed to get the work done.
  • We can help you determine which type of pump is best for your home.
  • We will know what size of pit needs to be made relative to the size of the sump pump.
  • We’ll ensure that the pit is properly sealed to keep dirt and debris out of the pump.
  • Finally, our professional plumbers can offer you tips to keep your sump pump in good condition and your home’s foundation dry.

With nearly 25 years in the plumbing business and over 85 years serving the Greater Toronto Area, our licensed and certified plumbers will go the extra mile to make sure you’re protected from flooding and water damage. Call us or get in touch with us online to learn more about maintenance or installation of your own sump pump.

Must-Know Facts About Kitec Plumbing: Recall, Lawsuit & Repair Costs

After January 9, 2020, you can no longer get compensation for the cost of replacing defective Kitec plumbing. You will have to pay out of pocket, which could easily amount to several thousand dollars down the drain.

But there is still time to make sure you get reimbursed for having these faulty pipes removed from your home. The sooner you act, the less you risk having to open your wallet later.

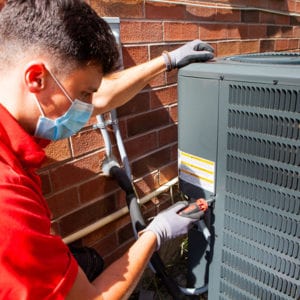
If you want to talk to our certified technician immediately you can call this number: 647-952-2012. Continue reading to learn everything you need to know about Kitec Plumbing.

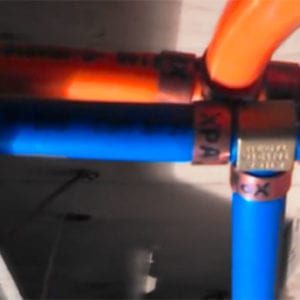
You know those bright, blue and orange pipes running from your water heater? Bad news: those colourful water lines could be a flood waiting to happen…and the time to replace them is quickly running out.

Kitec plumbing systems, which were recalled due to defects back in 2005, were installed in hundreds of thousands of homes across Canada – including many thousands here in the Greater Toronto Area.

Depending on the size of your house, the cost to replace defective Kitec plumbing could range in the thousands to tens of thousands of dollars.

Kitec is not an issue to take lightly, but don’t panic. There are several ways you can recoup the cost of replacing Kitec in your home through your insurance company, plumbing installer, or the ongoing Kitec class action lawsuit.

We’ll help you understand everything you need to know about Kitec systems in your home, including how to join the Kitec class action lawsuit.

  1. Quick Facts About Kitec
  2. What is Kitec Plumbing?
  3. How Do I Know if There’s Kitec Plumbing in My Home?
  4. How Much Does It Cost to Replace Kitec Plumbing?
  5. Can I Be Compensated For Kitec Plumbing in Canada?

Quick Facts About Kitec

  • Installed as plumbing and heating piping in Canada and the United States between 1995 and 2007.
  • Identified by a bright blue or orange colour and the label ASTM 1281.
  • Sold under the brand names Kitec, PlumbBetter, IPEX AQUA, WarmRite, Kitec XPA, AmbioComfort, XPA, KERR Controls, Plomberie Améliorée.
  • Recalled in 2005 due to failure of pipes and fittings, costing millions of homeowners thousands of dollars in catastrophic water damage.
  • Cost to replace Kitec plumbing depends mainly on the size of the house but typically costs upward of $2,000.
  • Homeowners with Kitec installations are entitled to get money from a $125 million settlement but time to claim that money is running out. You can join a class action lawsuit against the manufacturer IPEX. The deadline to join is January 9, 2020.

What Is Kitec Plumbing?

Kitec was the “go-to” pipe used in plumbing and heating installations between 1995 and 2007. It was manufactured by a company called IPEX Inc. which still exists to this day.

Kitec is a composite plumbing material made from five layers of metal, plastics and resin adhesives, with brass fittings.

The outermost plastic layer is usually colour-coded to indicate hot water (bright orange) or cold water (bright blue). The label ‘ASTM 1281’ is printed on the outer layer in black lettering.

Starting in the late 1990s, Kitec was marketed as a cost-effective alternative to copper pipe that was also much easier to install. IPEX Inc. and its distributor sold Kitec plumbing under the names Kitec, PlumbBetter, IPEX AQUA, WarmRite, Kitec XPA, AmbioComfort, XPA, KERR Controls, Plomberie Améliorée.

Kitec caught on big time. And why not? It was cheap, simple, and at first appeared to work just as well as traditional copper piping.

Of course, it wasn’t long before things started to go south.

Homeowners across Canada and the United States began to report numerous problems with Kitec pipes:

  • Despite layers of protective plastic and resin, both the aluminum layer of the pipes and the brass fittings had a tendency to corrode quickly.
  • Kitec fittings contained very high levels of zinc, which reacted with the chemical composition of Kitec and leached minerals into the pipe. This caused the fittings to degrade quickly and a build up of zinc oxide that restricted the flow of water.
  • The plastic and aluminum layers expanded and contracted with temperature changes, weakening over time until the pipe burst.

These defective pipes caused millions of dollars in damage in a very short period of time. Not only did people have to pay hundreds or thousands of dollars to have their pipes replaced, but many were also left with extensive water damage, structural deficiencies, electrical problems and black mould.

In 2005, Kitec plumbing was recalled across North America. Unfortunately, some plumbing and heating contractors continued to install Kitec plumbing for years afterward, so there are homes built as recently as 2007 which contain Kitec.

Many contractors and homeowners have been proactive in removing Kitec plumbing before it inevitably fails. There’s no telling exactly how many people live in homes that still use Kitec today…and unfortunately, many of them don’t even realize it’s a flood just waiting to happen.

Don’t wait until it’s too late. Talk to a licenced and certified plumber about having your Kitec plumbing replaced now while there’s still time to claim compensation for your trouble.

How Do I Know if There’s Kitec Plumbing in My Home?

Although Kitec pipes were sold under many names, they almost all have a few things in common that makes Kitec relatively easy to identify:

  1. Colour. Most Kitec pipes are either bright orange or bright blue. Ironically, this was originally one of its selling points, since it helped people distinguish their hot and cold water lines. Now, it helps us know which pipes need to go.
  2. Number. The label ‘ASTM 1281’is printed on the outer layer of Kitec pipes.
  3. Age. Knowing when the pipes were installed is also helpful, since most installations occurred during or after 1997 and no later than 2007.

One easy way to tell if your home has Kitec plumbing is to look at the pipes leading from your water heater. You can also check under your kitchen and bathroom sinks.

If you’re still not sure whether your home has Kitec, the best thing to do is to call a plumber now.

How Much Does it Cost to Replace Kitec Plumbing?

The cost to replace Kitec plumbing in Ontario really depends on the size of your house.

It’s difficult to pin down the cost of an ‘average’ Kitec replacement job because Kitec was installed in so many different types of homes: bungalows, townhouses, multi-story homes, and many, many condominiums.

Given such a wide range of possibilities, we’re reluctant to provide a concrete estimate without knowing anything about your home. However, we can say that it often costs upward of $2,000. If you don’t submit a claim before January 9, 2020, you will need to pay these costs out of pocket.

Understand that even if your Kitec plumbing has not caused problems yet, you cannot count on it to last. Many thousands of homeowners have made that mistake and paid dearly for it.

Contact us now for fast answers to any questions you have about replacing Kitec.

Can I Be Compensated For Kitec Plumbing in Canada?

If there is Kitec installed in your home (or did before you had it replaced) you may be able to receive some compensation to help cover the cost of replacing your Kitec pipes if you act as soon as possible.

Your potential avenues for compensation include:

  1. The class-action lawsuit against IPEX Inc.
  2. Home insurance coverage
  3. Your plumbing contractor

Please know that the following is provided for general information purposes only and does not constitute legal or professional advice. You should contact your legal counsel for advice on any specific legal issues and speak to a licensed and certified plumber regarding the Kitec plumbing in your home.

1. Join the Kitec Class Action Lawsuit

In 2012, the manufacturer of Kitec plumbing, IPEX Inc., entered into a class action lawsuit settlement for $125 million.

As part of this settlement, IPEX paid into a monetary fund will eventually be paid out to compensate homeowners and others who who had Kitec installations.

Homeowners in Canada who make a claim before January 2020 are eligible for 50% of the average cost to repair or replace Kitec piping and fittings.

To join the Kitec class action lawsuit:

  1. Visit the Kitec Settlement website. This site is run by the law firm representing the claimants.
  2. Find out if you are eligible to make a claim.
  3. Follow the instructions on the site to request and complete a claim form.

Unfortunately, even if you are eligible, there’s no way of knowing how much money you can or will receive from this settlement. Since there is a limited amount in the settlement fund, the amount that each claimant receives will depend on the number of claimants in total.

The deadline to file a claim is January 2020. Contact us to book your Kitec plumbing replacement today.

2. Make a Home Insurance Claim

Depending on the terms of your home insurance policy, you may be covered in the event of a flood caused by burst or leaking Kitec piping in your home.

Some home insurers have been willing to cover all or part of the cost to replace Kitec piping to avoid having to eventually pay out a claim for water damage.

However, this is not true of all home insurers.

Some insurers, when informed that your home has Kitec, will require that you replace it in order to keep your coverage…but not cover the cost of that replacement. Others will increase your insurance premiums if you do not have the Kitec plumbing replaced yourself.

In any case, it’s important to familiarize yourself with what your home insurance does and doesn’t cover when it comes to water damage.

3. Reach Out to Your Plumbing Contractor

When Kitec was recalled back in 2005, contractors who had installed Kitec were required to inform people of the recall.

If your contractor never bothered to inform you, they could be on the hook for the cost of replacing it.

However, since many homes with Kitec were purchased and sold before the recall, it’s not always easy to track down the contractor and hold them responsible.

What to Do If Your Home Has Kitec Plumbing

The first step will be to confirm that your home does, in fact, have Kitec. A licensed and certified plumber can do that in no time.

Next, you’ll want to have the plumbing assessed for any immediate risks. This will help you figure out the timeline for replacement and whether it is worth making interim repairs.

In the meantime, it’s also imperative that you know exactly how to turn off your water main in the event of a burst pipe. This is something we think every homeowner should know, but when you’re dealing with Kitec, you cannot take any chances.

You don’t have to deal with this alone. If you have any questions about Kitec piping and how it affects you, call us at 647-952-2012 or reach out to us online by filling out the form below.

Learn More About Kitec Plumbing Today

We’ll respond to your request within 2 hours during regular business hours. For emergency service, please call 647-952-2012.