How a Simple Plumbing Check Could Put More Money In Your Pocket

When was the last time you called a plumber?

If you’re anything like most people, it was probably when you needed some plumbing work done in your home. The majority of our plumbing calls come from customers who need a specific repair or upgrade (ideally as soon as possible.)

But isn’t that the only reason to call? Why contact a plumber when you don’t really need to?

Well, there are several reasons. For one, we always enjoy catching up with our neighbours! But there’s also a different type of service call we wish we received a lot more often:

Plumbing system checks.

From time to time, people call and ask for us to inspect their plumbing system ‒ even though there’s nothing obviously wrong with it.

What is a Plumbing System Check?

You might know them as plumbing inspections, tune-ups or diagnostics. We usually call them plumbing system checks. Whatever the name, the purpose of this service is the same: to find out the status of your plumbing system and stay ahead of any necessary repairs.

During a plumbing check, a licensed and certified plumber inspects various parts of your plumbing system, including toilets, sinks, showers, tubs, water pipes and drain pipes. They’ll check that fixtures have good water pressure and are draining properly. The plumber will also ask you questions about how your plumbing system has been functioning.

You’ll have a chance to talk about any specific problems or concerns that have come up since the last time your plumber was there.

Essentially, a plumbing system check is like an annual physical for your pipes and fixtures! It’s a chance to check up on potential problems, get a “big picture” of your plumbing system, and make plans for upgrades or repairs if necessary.

How Getting a Plumbing Check Could Save You Money

You might wonder: why go to all the trouble of having your plumbing system checked when you’re not even sure there’s a problem?

The people who invest in preventative checks don’t do it because they like spending money on their plumbing system. In fact, it’s the opposite.

Here are a few of the ways that a routine plumbing inspection could put more money in your pocket!

1. Find and Fix Leaky Pipes

You would be shocked to learn just how common it is to find water leaks in a home’s plumbing.

Some leaks, like dripping faucets, are obvious. But many go undetected for years because they’re hidden behind walls…even as they waste thousands of dollars in water each year!

How’s that possible? According to the City of Toronto:

  • 1/16’’ diameter hole (slightly larger than the tip of a ballpoint pen) costs $14.12 per day.
  • 1/8″ diameter hole costs $55.37 per day.
  • 3/16″ diameter hole costs $127.07 per day.

That’s an astonishing cost to just let slip by for so long!

Having your plumbing checked annually can help you catch on to those types of leaks far sooner.

2. Avoid Costly Water Damage

Sure, leaky pipes can cost a few hundred dollars to repair. But if that leak grows and the pipe eventually bursts…you could expect to be on the hook for thousands more just to clean up the mess.

It doesn’t take much time for a burst pipe to cause four-figure damage to your home. Water damage can also spur the growth of mould, which can be an even bigger headache to deal with in the aftermath.

It definitely pays to have those leaky pipes diagnosed and repaired as soon as possible.

3. Make Your Pipes Last Longer

Plumbing pipes aren’t made to last forever, especially ones made from outdated materials like polybutylene. But even the best-quality pipes installed by the most skilled master plumber will eventually need to be replaced!

Having them inspected will help you keep your pipes healthy and know when it’s time to have your system repiped.

4. Avoid a Plumbing Emergency

Speaking of repiping…the job is a whole lot smoother when it’s a planned project! Having to conduct emergency repairs on the spot comes with added costs and a much bigger mess.

Other plumbing emergencies, like sewer line collapse and sewage back-up, can also carry a very high price.

You can save yourself from thousands of dollars in damage by detecting potential problems like these before they reach a tipping point. That’s exactly what plumbing system checks are for!

5. Plan for Future Repairs and Renovations

A plumbing check gives you a detailed overview of your pipes, faucets, and other fixtures every year.

With this information, you can easily plan ahead for what needs to be replaced and when ‒ instead of fixing and replacing things as they break.

You can wait until the time is right. No more surprise plumbing expenses!

7 Signs It’s Time for a Plumbing Check

It pays to schedule an annual plumbing check, even when there’s nothing clearly wrong with your plumbing system. But if you’re seeing any of the following signs, you’ll want to book your appointment sooner than later to avoid bigger problems.

  1. Unusually high water bills
    Often a sign of a small leak somewhere in the system.
  2. Foul-smelling drain
    Indicates a partial clog, mould, or bacteria in your drain pipe.
  3. Unexplained sewage smell (occasionally or often)
    Could be a problem with your traps or drain ventilation that’s causing sewer gas to come into your home.
  4. Slow-draining tub, sink or toilet
    One of the most common signs of a clogged drain. Multiple slow-draining fixtures could indicate a more serious sewer line problem.
  5. Low water pressure
    Leaking faucets, mineral build-up, or a damaged shut-off valve are all possible causes.
  6. Discoloured or off-smelling water
    May be caused by rust, sulphur or other metals inside your pipes, or a problem with your water heater.
  7. Noisy/banging pipes
    Some of your pipes may not be properly secured.

Ready to book your annual plumbing check? AtlasCare will send a licensed, certified plumber to inspect your home in the Greater Toronto Area today. Call us or contact us online to schedule a same-day or next-day appointment!


5 Simple Things You Can Do Now to Keep Your Home Cozier This Winter

Once the calendar flips from October to November, life starts to get busy ‒ fast. There’ll be presents to wrap, gatherings to attend, dinners to make…in fact, things probably won’t slow back down until next year!

Needless to say, furnace trouble is the last thing you want to be dealing with over the busy holidays. Unfortunately, that’s exactly when trouble tends to call! You’d hate to be scrambling to stay warm, and keep your pipes from freezing on top of everything else.

The good news is that most common winter HVAC issues are preventable! All it takes are a few simple, proactive steps to get your home ready for winter. With a bit of help, you can get these jobs done and keep your home cozy in no time!

1. Check Your Furnace

First thing’s first: head down to the basement and give your furnace a good, old-fashioned inspection! Here are a few things you can safely do on your own before your annual furnace tune-up.

  • Tidy up around the furnace. It’s generally recommended to leave at least 3 feet of clearance around the unit, so put away any boxes or other odds and ends that were stored there over the summer. This will also make it easier for your HVAC technician inspect and service the furnace later!
  • Make sure your humidifier is set up for winter. Turn the water on for the humidifer and open the bypass damper if there is one. The damper is labelled either summer/winter or open/close.
  • Pay attention to sounds and smells. You know how your car sounds when something is wrong? Your furnace can also give audible warning signs. Be on alert for odd smells as well, especially the telltale “rotten egg” odour of gas.

2. Replace the Furnace Filter

Furnace filters remove particulates like dust, pollen and fibres from the air moving through your heating system. A dirty air filter restricts airflow and forces the furnace to work harder, thus consuming more energy and putting more strain on the unit.

  • Replace the filter now! Your furnace’s 1” filter should be replaced at least every 3 months during the heating season. Starting off with a clean filter means you won’t have to remember to replace it again until next year.
  • Consider an upgrade for cleaner air. The Minimum Efficiency Reporting Value or MERV rating tells you how well a filter removes various particulates from the air. Filters with a MERV rating of 9 to 12 will capture 95% of airborne pollutants like bacteria, dust and smoke. Just be sure your furnace is equipped to handle a filter with a higher MERV rating! These quite often require alterations to your existing ductwork.

3. Clean Your Air Vents

Any dust, lint or other “fuzz” that has accumulated on the vent over the summer will reduce the flow of air.

  • Check and clean the supply and return air vents around your home. Don’t forget spare bedrooms and bathrooms.
  • Make sure there’s space for air to flow. This is also a good time to make sure that none of these vents are blocked by furniture, area rugs or other objects.
  • Consider having your ducts cleaned. If you want to keep your ducts as tidy as possible, we generally recommend having a professional duct cleaning about every 3 years. You should have your ducts cleaned sooner if you notice excessive dust, restricted airflow, mould, odours or other signs that something’s wrong.

4. Test Your Thermostat

Your heating system can’t do its job if your thermostat isn’t working correctly! Many problems you’d assume are caused by your furnace actually originate with your thermostat. You might not have thought much about it over the summer, but now is definitely a good time to make sure your thermostat is doing its job.

  • Try adjusting the temperature a few degrees above or below room temperature and see how long it takes to adjust.
  • Check your thermostat’s programming throughout the day on a less busy day. Is it adjusting the temperature on schedule?
  • Consider a thermostat upgrade. If you find all these adjustments to be a hassle, you’re not alone. Smart thermostats make this all much

5. Watch the Humidity

Dry air is one of the most common discomforts in the home during winter. If your home doesn’t have a whole-house humidifier, you might start to notice a few of these signs!

  • Count the number of static shocks you get. Since dry air acts as an insulator, static electricity can easily build up to a nasty shock in the winter. If you’re noticing it more than usual, your humidity is definitely on the low side.
  • Notice chapped lips, cracked knuckles, and itchy, flaking skin. This prevalent winter problem is in part due to the dry air outside and the low-humidity, heated air indoors. Adding a humidifier to your home can help.
  • Look for moisture on the inside of your windows. This could be a sign of the opposite problem: poor ventilation causing excess humidity to build up in your home. Call a home comfort specialist before the problem leads to mould.

Get Ahead of Winter

There’s still time to get the job done and make sure your home is protected! Call us at 647-952-2012 or contact us online to book your seasonal furnace tune-up in the Greater Toronto Area today.

Why a Frost-Free Hose Bib Is a Must-Have for Canadian Homes

As the weather starts to change and the temperature drops, you’ve probably already started preparing for the long winter season.

You know there’s a lot to do around the home this season, but one area you might overlook is your hose bib ‒ or, as many people call it, your outdoor faucet.

During the summer, you might use your hose bib to water the garden, wash your car, or even hook up the sprinkler for your kids. When the warm season comes to a close, you pack away the hose, shut off the valve and move onto something else.

But what about the water that’s still sitting in the pipe?

Even if you purge the line, you could still end up with costly water damage if you don’t have a frost-free hose bib.

Let’s take a look at how a frost-free hose bib can help you avoid a burst pipe this winter! Read on to learn:

  1. What a hose bib is, and what it does
  2. How a hose bib is connected to the rest of your plumbing system
  3. Purpose of a ‘frost-free’ hose bib
  4. What can happen if your hose bib freezes
  5. How to prevent your hose bib from freezing this winter

What Is a Regular Hose Bib, and What Is It For?

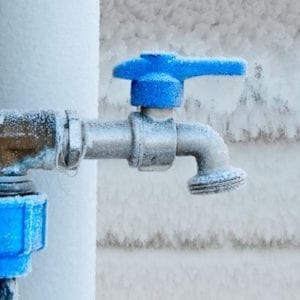
The hose bib is the small faucet on the exterior of your house. It’s essentially an outdoor tap that allows you to run water from the inside of your house to the outside. You use this tap to attach your garden hose for many different jobs.

A hose bib is also called a:

  • Exterior faucet
  • Spigot
  • Sill cock
  • Hose faucet
  • Outdoor tap
  • Hose valve
  • …and many other things!

A regular hose bib typically features a ½, or ¾ inch threaded pipe that lets you screw on a garden hose, and a handle on the top to open the valve on and off.

Inside your home, there is usually a shut-off valve that lets you stop the flow of water leading from the valve to the end of the pipe.

How Does a Hose-Bib Work with the Rest of Your Plumbing System?

Your hose bib is connected to the entire plumbing system in your home, which is what allows you to get water to the exterior of the house. The pipes lead from the end of the hose bib to the main supply in your home.

As mentioned, many homes, especially in the north, have a separate valve inside the house to help prevent the pipes from freezing. But one issue many homeowners run into is that the valve is still too close to the exterior of the home.

When the valve isn’t far enough away from the hose bib, the water is still sitting dangerously close to the freezing zone.

A frost-free hose bib prevents that issue from occurring.

What Is a Frost-Free Hose Bib?

From the outside of your home, a frost-free hose bib looks the same as a traditional one. The difference between the two happens inside the house.

The pipe on a frost-free hose bib is longer than a regular one, and the shut-off valve is further inside the house where the temperature is warmer.

We always recommend having a licensed, certified plumber install your frost-free hose bib, since they can ensure that it sits at the proper angle to keep water from draining to your home’s foundation.

What Happens If Your Hose Bib Freezes?

If your hose bib freezes, it could lead to cracked pipes and water damage. When the pipes break, the damage could spread beyond the valve, which would cause the main flow of water to spray inside your home. Since these pipes often lie near essential components of the house, such as breakers, electrical wiring, and appliances, we consider this a plumbing emergency.

How to Prevent Your Hose Bib from Freezing in the Winter

The best way to prevent your hose bib from freezing this winter is to install a frost-free hose bib.

We understand how important your home is to you and how much time you spend taking care of it, so the last thing you should have to worry about this winter is water damage!

The team at AtlasCare is happy to help you protect your home this winter. Call us or contact us online to learn more about having a frost-free hose bib installed in your Greater Toronto Area home.


Lead in Drinking Water: Guide for Toronto, Halton and Peel Region

Until recently, you might’ve thought that lead pipes were a thing of the past. But a recent investigation by Global News and The Toronto Star has served as a wake-up call to the fact that lead is still a very real concern here in the Greater Toronto Area.

The truth is, there are nearly 26,000 city-owned lead water pipes still underground in Toronto. There are even more lead pipes in service on private properties in Toronto, Oakville, Mississauga and the surrounding regions.

You want to make sure your family’s water is safe. As certified plumbers, we have received a lot of calls about this in recent days. We want to help you by providing concrete information on this issue as it pertains to homeowners in the Region of Halton, Peel Region and the City of Toronto.

In this guide, we’ll discuss:

  1. Why people are suddenly talking about lead in drinking water
  2. How and why water becomes contaminated with lead in the first place
  3. What constitutes an unsafe level of lead in drinking water
  4. How to find out if there is lead in your home’s drinking water
  5. What you can do to protect yourself and your family

We will also provide links to sources with more information at the end of this article.

Why Is Lead-Contaminated Drinking Water Back In the News?

Until 1975, lead was commonly used as a material for plumbing pipes. Lead was also present in solder used to join pipes together until 1986, and could be found in faucets and plumbing fixtures and hardware as recently as 2014.

Although lead water pipes have been banned in Canada since the mid-70s, many thousands of lead pipes remain in service to this day. Fixtures and solder containing lead are also present in homes, schools and other buildings.

Recently, a group of Canadian journalists published the results of a Canada-wide investigation into the concentration of lead found in our drinking water. This has served as a wake-up call on the prevalence of lead in Ontario schools and daycares, one third of which tested for higher-than-recommended levels of lead.

The reports have also sparked renewed concerns about the possibility of lead turning up in the water we drink every day at home.

How Does Lead Get Into Drinking Water?

In Canada, lead rarely enters the water at its natural source (which in our region is Lake Ontario) or at a water treatment plant. In most cases, water becomes contaminated at some point between the water treatment and the tap due to aging lead pipes.

Like any metal, lead is prone to corrosion. When pipes and other plumbing materials containing lead begin to corrode, water can become contaminated with dissolved lead.

Lead can enter drinking water at various points between the treatment plant and the tap. It can seep in from a city-owned water supply line, a water line on private property, solder in a joint between pipes, a water valve, or a fixture like a faucet or drinking fountain.

The risk of lead contamination depends on many factors, including:

  • How long water stays in the pipe (stagnant water has longer exposure)
  • Temperature of the water (warm water is more corrosive than cold water)
  • Amount of lead in the pipe or fixture (whether they are ‘pure’ lead materials)
  • Water chemistry (soft water is more corrosive than hard water)
  • Types and amounts of minerals in the water

What Is Considered an Unsafe Amount of Lead?

Lead levels in drinking water are measured based on the amount of lead (in milligrams) found in a one-litre water sample.

On March 25, 2019, Health Canada updated the federal guideline for lead in drinking water from 0.010 mg/L to 0.005 mg/L, reducing the acceptable concentration of lead in half.

As of November 2019, the guidelines in Ontario have not been brought in line with the federal guidelines. In Ontario, a concentration of 0.010 mg/L is still considered acceptable.

However. Health Canada and the CDC agree that there is no “safe” level of lead when it comes to babies, children and developing fetuses. Lead exposure, even at low levels, can interfere with brain development.

How Can I Find Out If There is Lead in My Home’s Water?

Houses built before 1975 are at a higher risk of lead contamination because they are more likely to have lead plumbing. If your home is 50 years old or more, it is also possible that the water supply line from the city to your home is made of lead.

Houses built as late as 1986 could also be exposed to lead through lead-based solder used in water pipes. Additionally, any metal plumbing fixtures installed in Canada before 2014 could contain as much as 8% lead.

To find out if your drinking water contains unsafe concentrations of lead:

1. Contact a Licensed and Certified Plumber

The most efficient and accurate way to get answers about your home’s drinking water. A licensed and certified plumber can inspect your plumbing system for lead and offer a variety of solutions if your home is discovered to have lead pipes.

2. Inspect Your Pipes

Lead pipes are not easy to spot at first glance if you don’t have much experience with plumbing. However, there are a few things you can do to try and determine if a specific pipe is made of lead:

  • Lead is non-ferrous, so pure lead pipes will not attract a magnet.
  • Lead is easy to scratch with a knife or key.
  • Lead is a dull grey colour, but fresh scratches will appear silvery.

Keep in mind that the majority of your home’s plumbing system is ‘invisible’ − hidden behind walls, beneath floorboards and under the ground. Just because you cannot see any lead pipes doesn’t mean they aren’t there.

3. Have Your Water Tested

An accredited laboratory that is licensed to test for lead can test a sample of your water for a fee.

Depending on where you live and the age of your house, you may also be eligible for free water testing through your regional government.

  • Toronto: If your home was built before the mid-1950s, you can submit a water sample to the City for free testing
  • Mississauga, Brampton and Caledon: You can call or email the Region to request a free lead water test.
  • Oakville, Milton and Halton Hills: If your home was built before 1990, you can ask Halton Region to test for lead levels from your indoor tap for free.

If you’re worried about your drinking water, we recommend installing a reverse osmosis filtration system. It removes 99% of all common chemical contaminants, bacteria and sediment. You’ll be prepared for any drinking water issue that comes to light.

How Can I Protect My Family from Lead?

We understand how stressful it is to question whether your water is safe to drink. Here are several concrete solutions you can take immediately, in the near future, and in the long term to protect your family.

What To Do Right Now

  • Do NOT boil water before drinking it if you suspect it contains lead. Because water evaporates during boiling, this actually increase the concentration of lead in the water.
  • If water has not been used for several hours, run each tap until it becomes colder (for 30 seconds to 2 minutes) before drinking or cooking. This flushes the line and can reduce the concentration of lead by up to 90%.
  • If you have a baby who is on formula, use ready-to-drink formula instead of formula that must be prepared with water.

What To Do Next

What To Do Eventually

  • Have any lead pipes or fixtures containing lead removed and replaced. Although a reverse osmosis filter can ensure that your water is safe according to Health Canada’s guidelines, repiping is the only way to guarantee that all sources of lead are removed from your water supply.

More Information

To book a same-day or next-day plumbing inspection for your home in the Greater Toronto Area, call (905) 829-1296 or get in touch online. Our plumbing technicians can quickly determine whether your home’s plumbing system is safe.

We can also install a reverse osmosis filtration system, which removes traces of lead and 99% of all common chemical contaminants, bacteria and sediment from your drinking water. With a reverse osmosis system, you can rest assured that your family is safe from exposure to lead from household plumbing or city-owned water lines.

For more information about lead contamination in drinking water:

To find out if you are eligible to have your water tested for free by the City or Region: